CNV 检测
CNV基本上不能算在常规检测流程里面,一般都是有需求的时候才会去做的。大多数的CNV检测软件都是采用多个样本比对的方法,就是需要正常样本和待检样本作对照。如果是自己分析的思路,可以是对基因组一定大小划分windows,然后统计每个windows的read counts(或者RPKM、TPM等)。然后将对照组和检测样本横向比较每个windows的read counts,基本上可以参考的是Z检验算法。最终得到是Z值(相当于),然后就可以知道对应区域是拷贝数增多还是减少。常用软件有CoNIFER、freec、cnvnator。像分析单个外显子的缺失,这种可以使用DECoN,我在博客里也写过了。
一般来说,WES使用CoNIFER、WGS使用freec。
以下是从官方文档里抄来的流程。
cnvkit
大概以后会默认使用cnvkit,毕竟方便。cnvkit单次配对样本的使用方式如下:
| cnvkit.py batch tumor.bam \
--normal normal.bam \
--targets my.bed --fasta Homo_sapiens_assembly38.fasta --annotate refFlat.txt \
--access access.hg38.bed \
--output-reference reference.cnn --output-dir output/ \
--diagram --scatter
|
refFlat下载
access文件的生成可使用encode blacklist 来去除不能比对的区域。
hg19 hg38
| cnvkit.py access Homo_sapiens_assembly38.fasta \
-x ENCFF356LFX.bed \
-o access.hg38.bed
|
更多的时候,使用单个肿瘤样本进行分析。建议是先使用多个通过同一实验条件做出来的正常样本数据建立参考基线,先生成target和antitarget的bed文件。
| cnvkit.py target my.bed --annotate refFlat.txt -o target.bed --short-names
cnvkit.py antitarget target.bed -g access.hg38.bed -o antitarget.bed
|
把这些正常的normal bam统统丢进同一个文件夹,然后用下面命令建立一个参考基线
| cnvkit.py batch -n normal/*.bam --output-reference reference.cnn \
-t target.bed -a antitarget.bed \
-f hg38.fa -g access.hg38.bed
|
在新分析样本时,就可以用上这个参考
| cnvkit.py batch tumor.bam -r reference.cnn -d output/
|
上面其实是cnvkit的合并模式,也可以拆开每一步来进行。下面的命令供参考:
1
2
3
4
5
6
7
8
9
10
11
12
13
14
15 | # 对每个样本
cnvkit.py coverage sample.bam target.bed -o sample.targetcoverage.cnn
cnvkit.py coverage sample.bam antitarget.bed -o sample.antitargetcoverage.cnn
# 对所有正常样本
cnvkit.py reference *Normal.{,anti}targetcoverage.cnn \
--fasta Homo_sapiens_assembly38.fasta -o reference.cnn
# 对肿瘤样本
cnvkit.py fix tumor.targetcoverage.cnn tumor.antitargetcoverge.cnn \
reference.cnn -o tumor.cnr
cnvkit.py segment tumor.cnr -o tumor.cns
cnvkit.py call tumor.cns -o tumor.call.cns
cnvkit.py scatter tumor.cnr -s tumor.cns -o tumor.scatter.pdf
cnvkit.py diagram tumor.cnr -s tumor.cns -o tumor.diagram.pdf
|
cnvkit中有一个--method参数,默认是hybrid(液相杂交捕获),可选amplicon(引物扩增),wgs(全基因组)。视实验方法而定咯。
当然,在分析获得cnr后,可以不进行segment直接call,这样不会把区域合并。
| cnvkit.py call tumor.cnr -o tumor.call.cns
|
CoNIFER
CoNIFER据称可以去除多批次的实验做成的误差。软件只支持python2,不支持python3,另外已经有7年没有更新过,所以如果有更好更新的替代品,可以放弃使用CoNIFER。软件的安装还有一些依赖的包的安装就不说了。
统计rpkm
首先是对bam文件统计rpkm值
| python conifer.py rpkm --probes probes.txt --input sample.bam --output sample.rpkm.txt
|
另外,如果运行时报这个错误
| AttributeError: 'pysam.libcsamfile.Samfile' object has no attribute '_hasIndex'
|
分析
然后是conifer的主分析程序,这一步是对rpkm进行统计,因为CNV分析需要用到多个样本进行对比,所以这里的input是装有多个rpkm统计表的文件夹。
| python conifer.py analyze \
--probes probes.txt \
--rpkm_dir ./RPKM/ \
--output analysis.hdf5 \
--svd 6 \
--write_svals singular_values.txt \
--plot_scree screeplot.png \
--write_sd sd_values.txt
|
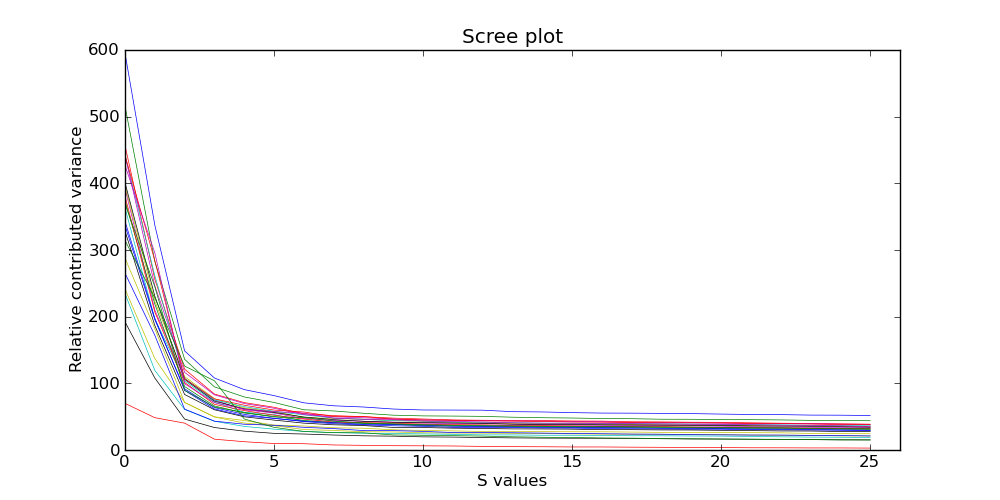
conifier建议根据出来的这幅图来设定svd的值,一般设置在拐点,比如上面这幅图能得到的建议是把svd设置在2到5之间。
由于pytable这个包版本更新,运行时可能会报错
| ImportError: cannot import name openFile
|
| AttributeError: 'File' object has no attribute 'createGroup'
|
结果生成
结果生成使用的是上面输出的hdf5文件
| python conifer.py call \
--input analysis.hdf5 \
--output calls.txt
|
导出数据
| # 所有样本
python conifer.py export \
--input analysis.hdf5 \
--output ./export_svdzrpkm
# 单个样本
python conifer.py export \
--input analysis.hdf5 \
--sample SampleID \
--output ./export_svdzrpkm/sample.svdzrpkm.bed
|
可视化
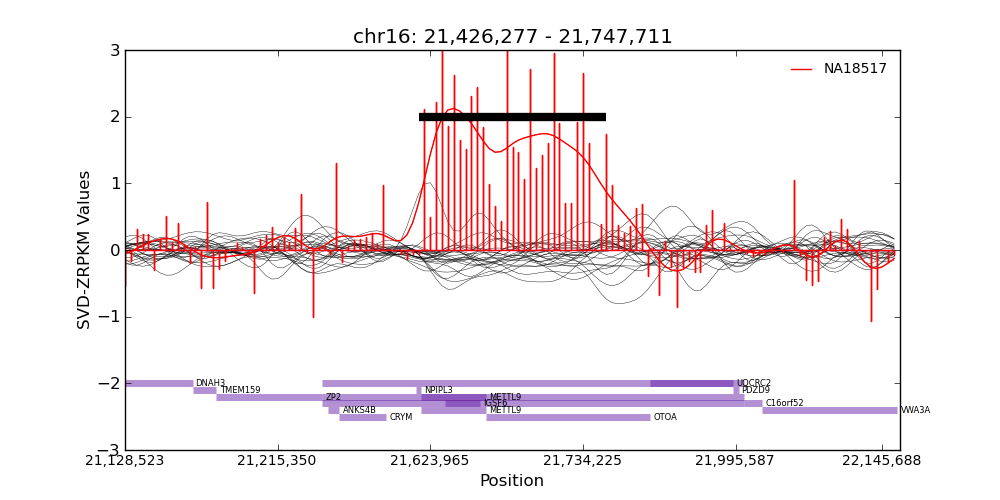
conifer提供了可视化的方法
| python conifer.py plot \
--input analysis.hdf5 \
--region chrxx:start-end \
--output image.png \
--sample sampleID
|
还有两个其他方法
1
2
3
4
5
6
7
8
9
10
11
12 | # 样本高亮
python conifer.py plot \
--input analysis.hdf5 \
--region chr#:start-stop \
--output image.png \
--sample r:sampleID1 b:sampleID2 g:sampleID3
# 输出所有位置
python conifer.py plotcalls \
--input analysis.hdf5 \
--calls calls.txt \
--outputdir ./call_imgs/
|
freec
freec适合检测全基因组的CNV。最新版是2018年8月的,可以算比较新了。相比上面的conifer,我觉得freec的使用要更麻烦一些,可以参阅tutorial,除了软件之外,还需要下载数据库,需要创建一个config文件,但是freec出来的图也是挺一目了然的。
